Pages

Tuesday, October 29, 2013

WOYWW

I am so happy to be back to the party!!!  Want to know what party?  Click HERE !!

Here is my desk:
I am making projects right now, but it looks like I'm throwing stuff out!!  Nothing eventful, yet!  Just my badge and an elf shoe.  Elf shoe?  Yes.  But SSSHHhhhhhh~

Enjoy peeking!!

Monday, October 28, 2013

HALLOWEEN ART JOURNAL PAGE

I love Halloween!  I always have.  
We have lived in our new house for 2 1/2 years and I didn't decorate for Halloween until this year.  It really put me in the mood again, for Halloween and for Autumn.

So with the Halloween season coming to a close very soon, I thought I would make a Halloween art journal page!  I follow a Facebook group,  "All things Terri Sproul", and she made a Halloween art journal page this week so I followed along!

Terri and I are on a few design teams together.  One is Sin City Stamps.  They have the most awesome stamps!!  I  have 2 Halloween sets, I used both on this piece.

Gather your supplies:
  • Your favorite Art Journal
  • Sin City Stamps "Halloween Bingo"
  • Sin City Stamps "Skeletons"
  • Stewart Superior Jet Black India Ink
  • Smeared Ink Grave stamp
  • Ranger Distress Inks, Black Soot, Faded Jeans, Evergreen Bough, Peeled Paint
  • Yasutomo Permawrited Black 0.5 Pen

Start by using your inks to make a dark blue sky on top, leaving a blank space for the moon.  Continue down to the bottom by blending in green and ending with light green.


Using your India Ink, stamp your images from your stamp sets.


Finish it off by putting a sentiment in the moon.  I wrote "Something wicked this way comes".  

Enjoy the rest of the Halloween season!  Eat lots of candy!!


Saturday, October 26, 2013

LESLIE RAHYE'S SPOOKY STEAMPUNK BLOG HOP

Hello and welcome to my blog!  I am so happy to be joining my girl, Leslie Rahye, who has dreams of blog hop bliss!  She just LOVES hosting them and every month she hosts one, just cuz she is awesome like that.
This hop is titled "Spooky Steampunk".  Here's what I made:

Enter......if you DARE!!
It all started with some foil tape and a diamond plate Cuttlebug folder!  The combo had Steampunk written all over them!  I added ink, paint, metallic rub and cool metal findings.  The number 31 was calling my name for this door!  So, I added it.  I couldn't resist putting some "blood" fake blood that sticks to your window at Halloween time on the door.  I'm just saying, I wouldn't enter that door for anything!

Here is the blog link.  And if you follow the rules (find the on Leslie Rahye's blog below) Leslie Rahye is offering a prize!  No tricks, only treats!!

Tuesday, October 15, 2013

WOYWW

EEK!!  THE PARTY STARTED WITHOUT ME!!
What party you ask?  Check out Julia's blog for the answer!

Here is my desk.  A work in progress in the lower left corner and paint on the craft sheet!  You see my WOYWW badge is right in the middle!!

And that is all I have!  I hope you enjoy the rest of the desks!

Monday, October 14, 2013

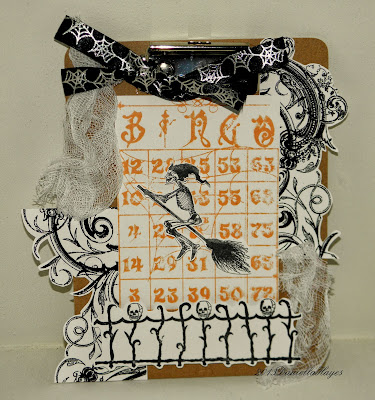
HALLOWEEN CLIPBOARD

Is everyone in the Halloween spirit yet?  I know I am!!
I'm sharing a project I made for Sin City Stamps.  A decoration for my foyer table.


SUPPLIES:
Sin City Stamps Skeleton Plate
Sin City Stamps Halloween Bingo
The Robin's Nest Black Swirl Patterned Paper 
Stewart Superior Black India Ink
Ranger Distress Ink "Dried Marigold"
Misc. clipboard, ribbon and gauze


First gather your supplies and stamp your images.


Fussy cut swirls from Robin's Nest paper and adhere them to the clip board.  Stamp the Bingo card and cut it out.  Adhere it to the center of the clipboard.  Add ribbon to top by knotting it to the clip part.


Stamp fence and Witch and fussy cut them out.  Adhere them to the clipboard with foam dots.


Add some fun gauze around the edges.  I think it looks like cob webs!!

I hope you enjoyed my project!  I hope you are getting ready for your Halloween!!

Saturday, October 12, 2013

SIN CITY STAMPS BLOG HOP!

Hello!!  Thank you for joining the Sin City Stamps Blog hop!

You will hop from blog to blog, see our BEE-U-TEE-FUL work, and see the awesome stamps Sin City has to offer!

To be entered to win the prize you saw at the SIN CITY STAMPS BLOG, remember to leave a comment on all the blogs and like us on FACEBOOK!

Here is my project.

I used this amazing black and white glitter cardstock from The Robin's Nest, perfect for Halloween. Then, I used Stewart Superior black India Ink to ink up my Sin City Stamps!!  This is from the Halloween Bingo set.  How fun is that writing with the spider web in the "O".  And the bottle stamps are sweet!

Thanks for visiting today!  And please leave some love at the other blogs!  Don't forget the prize!!!


Friday, October 11, 2013

IRIS PAPER FOLDING

I have a really awesome project to share with you today!!

I was thinking of something to make for the Niji Yasutomo Company and BANG!  It hit me!
Iris Folding!!!

I haven't seen or heard this in a long time so I was so excited to make this!!!
We were given so many beautiful origami papers to work with, I couldn't wait to get them out!

I took out 4 different types of paper.  I took 1 piece from each pack to get 2 yellow and 2 blue.

Then, I cut a vase out of a piece of white cardstock.


I had to make flowers to come out of the vase (the vase looks good with just that awesome yellow zebra print paper!!).  I got to use the Yasutomo Watercolors and Niji Water brushes for the first time and they are AMAZING!!!  I am no painter by any stretch of the imagination but these products make it so easy!   I am shocked by how awesome my flowers and leaves are!!

NOW, the iris folding.
Pick at least 4 different patterns/colors of paper.  Cut them into one inch strips.  Then, fold them in half.  You will have half inch strips to begin your project.

This system of attaching paper is done on the back of your die cut paper.  It will go in a circle one piece at a time.  You start on the left of the cut out and tape your strip of paper along that edge.  Always tape it with the folded side in the die cut.  Keep going around in a circle, adding paper.  Look at the shape and apply the papers in different colors for each section of the shape.  For example, I wanted the neck of my vase to be blue so as I made my circle of paper I made sure the top of the shape always had blue paper.


Flip your paper over every now and then to be sure your circle is looking awesome!!!

At the end, there will be a hole in the center.  Put a coordinating paper background on it.  I added another, larger piece to make a nice matting.  I also added some yellow pastel to the outside.

Thanks for visiting!!  You can find all of the products I used at the Yasutomo.com site.
Have an awesome day!!
SUPPLIES:
Yasutomo Fold'ems Origami Paper "solids" 4251 and "animals" 4804
Yasutomo Yuzen Paper 4337 and Blue 4336
Yasutomo Authentic Chinese Watercolors CP12
Niji Oil Pastels
Niji Water Brush Small


Tuesday, October 8, 2013

WHAT THE HECK??? AND WOYWW

September 23rd?  Really?  How could this be????

I haven't blogged in 2 weeks!!!!!

I feel awful!  I wouldn't be surprised if no one visited me anymore!  But I hope someone will. 

So much has been going on.  I'll tell you as we go through this post!

Here is my work desk.
Lots of  Ranger supplies out on my desk.  And my WOYWW badge.  If you want to know more about that check out Julia's blog!!

This is a skull I made for Altered Arts Magazine.  I used mica flakes from Stampendous all over it and colored the eyes black and the teeth white.  I think it is really creepy!!
AND,  I am the new Design Team Coordinator for Altered Arts Magazine too!!  I am so excited about this awesome opportunity!  This is why I have been missing lately.  Lots of things to learn, and do.  It is awesome!!!


This is a tag I made today for the newest Tim Holtz Class Creative Chemistry 102.  This tag uses Ranger products and stencils!

That's it for me!  I hope you have all been awesome!!!  I can't wait to visit you!!